Frequently Asked Question
Encrypting Email with Outlook on Desktop
1. Launch the Outlook Application
2. New Email, as shown below. Doing so will open a separate message composer window.

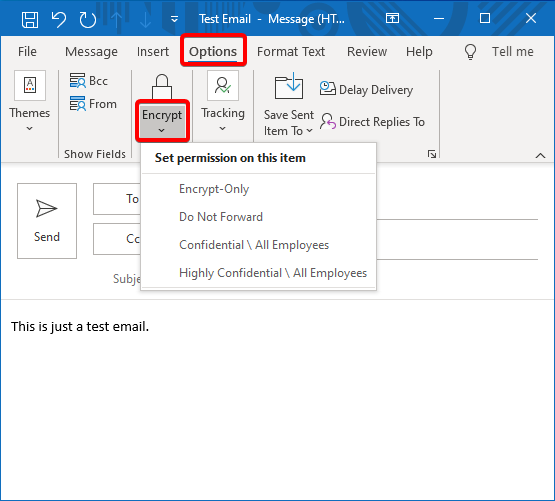
3. In the separate message composer window, click on the Options tab as shown below in the following screenshot.
Right below the padlock icon on the toolbar, click on Encrypt, followed by the permission you’d like to apply to this email.
Alternativity, in the subject title of the email, enter the words Confidential. This will then encrypt the email.
Outlook groups various “permissions” under the umbrella of “encryption,” which may be confusing. If you set any “permission'” in the Encrypt dropdown, the email will be encrypted. If you choose a “permission” other than Encrypt-Only other features will be added to the email.
Outlook provides you with options for email protection.
- Encrypt Only – This only encrypts the message without additional permissions.
- Do Not Forward – Recipients can read the message but cannot forward, print, or copy the content. The data owner has full permission to their message and all replies.
 Encrypting Email in Outlook
4. Now, send your email knowing that it’s fully protected.
Encrypting Email with Outlook on the Web (Outlook.com)
1. Compose an email by clicking on the New message button at the top-left corner of the page.

2. At the top of the message editor, click on the Encrypt link. This action will bring up the message editor.

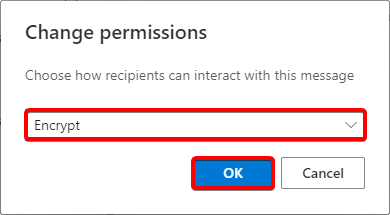
3. In the message editor, you’ll see a message pop-up at the top. To modify permissions for the email, click on the Change permissions link.
By default, all email sent with via outlook.com is encrypted.

5. From the pop-up window, click on the drop-down box and choose the permission to set for your email, then click OK.
The permissions to choose from are the same as demonstrated previously with Outlook on the desktop.
5. Now, send the encrypted email!
Reading Encrypted Email in Outlook
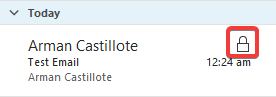
If you are using Outlook and Office 365 and are sent an encrypted email from someone else on Office 365 and Outlook, you’ll see a padlock next to the message as shown below. This padlock on the email indicates it is encrypted and sent from another Office 365 account
To decrypt it, open the email. There are no other hoops to jump through. But what if it came from another email provider?
Reading Encrypted Emails Sent from Other Email Providers
Different email providers have different ways to encrypt email. If you’re sent an email to your Office 365 account using Outlook, your experience won’t be as seamless as Office 365 —> Office 365.
Perhaps you’ve received an encrypted email from a Gmail account. Emails received from providers other than Office 365 usually have instructions on how to view the email content. But in this case, you’re able to read what’s inside the email by clicking on it.
To verify the email’s encryption details, click on the padlock icon at the email’s right-most part.
